Before you even think about filling out your Canadian citizenship application, you need to be absolutely sure you tick all the boxes required by Immigration, Refugees and Citizenship Canada (IRCC). This isn’t just a quick once-over of a checklist. It’s about taking a hard look at your time in Canada, your language skills, and your tax history to make sure everything is in order.
Getting this right from the start is the most critical part of your journey to becoming a Canadian citizen.
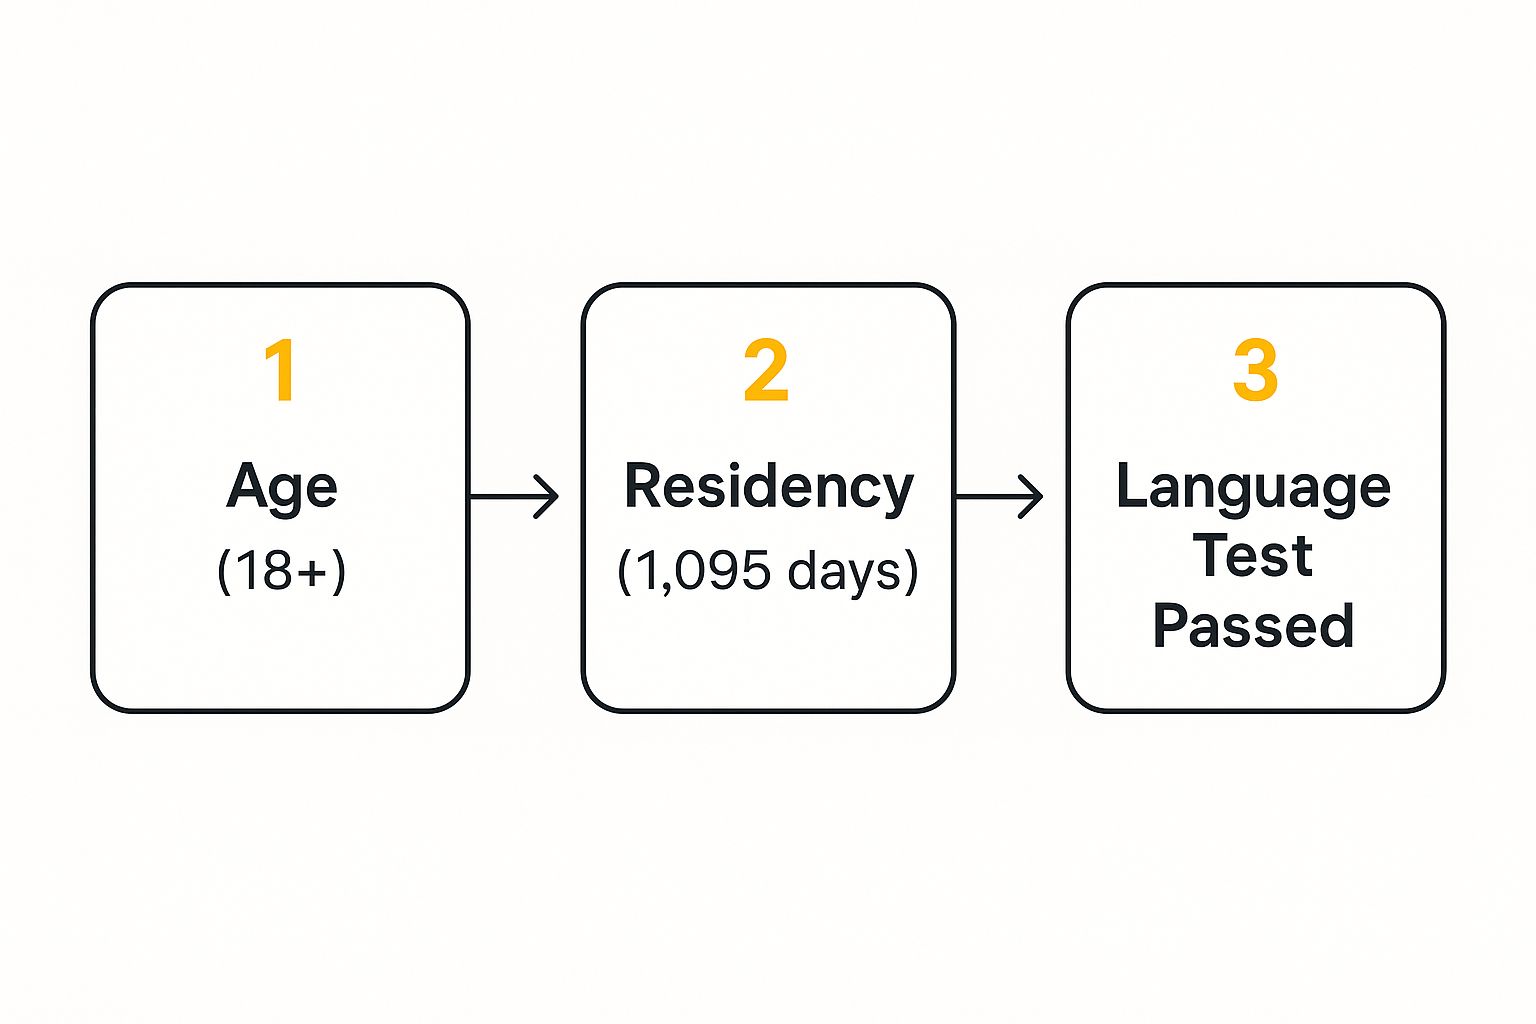
Confirming You Are Ready to Apply for Citizenship
The path to Canadian citizenship really begins with an honest self-assessment of your eligibility. For many people, especially those in Ontario who might have moved from a student visa to a work permit and then to permanent residency, this stage can be surprisingly tricky. It’s not enough to just be a permanent resident; you have to show that you’ve truly established your life here, and you have to do it by the book.
Don’t skip this step. If you apply without meeting every single requirement, your application will be refused. That means lost time, lost money, and a lot of frustration. Think of it like building a house—you can’t put up the walls until you’re certain the foundation is solid.
To give you a quick overview, here are the core requirements you need to meet.
Core Canadian Citizenship Eligibility at a Glance
| Requirement | Details |
|---|---|
| Permanent Resident Status | You must be a valid Permanent Resident of Canada. |
| Physical Presence | You must have been physically in Canada for at least 1,095 days in the 5 years before you apply. |
| Tax Filing | You must have filed your income taxes for at least 3 of the last 5 years. |
| Language Skills | If you’re between 18 and 54, you must prove you can speak and listen in English or French to a specific level (CLB 4). |
| Citizenship Test | If you’re between 18 and 54, you must pass a test on the rights, responsibilities, and knowledge of Canada. |
This table covers the basics, but let’s break down a few areas where people often get tripped up.
The Physical Presence Calculation
One of the biggest hurdles is proving you’ve been physically present in Canada for at least 1,095 days within the five years right before you sign your application. The way IRCC counts these days isn’t always straightforward.
Here’s how the math works:
- As a Permanent Resident: Every day you spend in Canada after getting your PR status counts as one full day. Simple enough.
- Before Becoming a PR: Time you spent here as a temporary resident—say, on a study or work permit—also counts, but differently. Each of these days is counted as a half-day.
- A Cap on Temporary Time: There’s a limit. You can only use a maximum of 365 days’ worth of credit from your time as a temporary resident.
Let’s look at a real-world example. Say a software developer in Mississauga was on a work permit for two full years before she became a permanent resident three years ago. She can count those two years on her work permit as one full year (365 days) toward her citizenship. Add that to the three years she’s been a PR, and she’s well over the 1,095-day requirement.
Language and Tax Obligations
Beyond being physically present, you have to show you can communicate in one of our official languages. If you’re between 18 and 54 years old, this means providing proof. You’ll need to submit results from an approved test, like the CELPIP or IELTS General Training, showing you’ve hit a Canadian Language Benchmark (CLB) level of 4 or higher in speaking and listening.
It’s a classic mistake to think you’re exempt from the language test just because you work or went to school in English. IRCC needs objective, standardized proof, and an official test result is the only thing they’ll accept.
You also have to show you’re an established part of Canadian society by filing your taxes. You must have filed personal income taxes for at least three of the last five years. IRCC will check this directly with the Canada Revenue Agency (CRA), so make sure your tax records are clean and up to date.
The ins and outs of immigration law can feel overwhelming, but a clear understanding of your own eligibility is the best place to start. If you’re feeling unsure, you can learn more about your options by exploring immigration lawyers offering a free consultation.
As you can see, nailing down your age, residency, and language qualifications is the bedrock of a strong citizenship application.
Assembling Your Application Documents

Let’s be honest: gathering the paperwork is often the most tedious part of applying for Canadian citizenship. It’s also where things can easily go wrong. A single missing paper or a photo that doesn’t meet the rigid specifications can send your application right back to you, causing frustrating delays. This is the stage where your attention to detail really counts.
Think of your core documents as the foundation of your entire application. These are the non-negotiables that Immigration, Refugees and Citizenship Canada (IRCC) will check first. Getting these right from the outset is your first major step toward a successful submission.
The Essential Document Checklist
Before you get bogged down in the more complex bits, let’s start with the basics. Each one of these items proves a critical piece of your eligibility puzzle, from who you are to your status in Canada.
- Photocopies of Your Passports: You’ll need clear, legible copies of the biodata page from every passport or travel document you’ve held in the last five years. Yes, that includes any that have expired during that time.
- Proof of Permanent Resident Status: This is usually a simple photocopy of both sides of your valid PR card. If your card has expired, don’t panic—just make sure you include proof that you’ve already applied for a new one.
- Government-Issued Photo ID: IRCC wants to see another piece of photo ID besides your passport. A Canadian driver’s licence or a provincial photo card works perfectly.
- Citizenship Photos: Pay close attention here. The requirements for these photos are incredibly specific, covering everything from the exact dimensions and background colour to your facial expression. Submitting the wrong kind of photo is one of the most common—and easily avoidable—reasons for an application to be returned.
Getting your application right the first time is more important than ever. In the first half of 2025, Canada granted citizenship to 152,185 people. That’s a significant dip from the nearly 380,000 new citizens per year we saw in 2022 and 2023. This change signals a more deliberate pace from the government, so a flawless application gives you the best chance of moving through the system without a hitch. You can get more context on this shift by checking out the latest citizenship data.
Proving Your Time in Canada
This is where many people get tripped up. You have to prove you were physically in Canada for at least 1,095 days, and you must use IRCC’s official online calculator to do it.
To fill out the calculator accurately, you need a meticulous travel history. This means digging up the exact dates for every single trip you took outside Canada during your five-year eligibility window. A great way to cross-reference your memory is to request an official travel history report from the Canada Border Services Agency (CBSA). My advice? Request this report early, as it can take a while to arrive.
One of the best tips I can give you for the physical presence calculator is to proofread every single entry. A simple typo—transposing the day and month, for instance—can throw off your entire day count and get your application sent back as incomplete.
This calculation can get even trickier if you were in Canada on a temporary status before becoming a permanent resident. For example, if you spent time in Ontario on a work permit, you need to be precise about those dates to correctly claim the half-day credits you’re entitled to. If that’s your situation, it might be worth reviewing our guide on work permit application requirements to refresh your memory.
Language and Security Documents
Finally, you’ll need to provide documents that satisfy the language and security screening requirements.
If you’re between the ages of 18 and 54, you have to prove you can speak and understand English or French. This means submitting the official results from an approved language test, like CELPIP or IELTS, showing you meet or exceed the Canadian Language Benchmark (CLB) level 4 for speaking and listening.
Police certificates are another key component. Did you spend 183 days or more (cumulatively, not all at once) in a country other than Canada in the four years before you apply? If so, you’ll need to get a police clearance certificate from that country. This is a mandatory security check for all applicants aged 18 and over, so don’t leave it to the last minute. Obtaining these from overseas can be a very slow process.
Getting the Application Forms and Submission Right

You’ve gathered all your documents, and now it’s time to tackle the official application forms. This is where your attention to detail really counts. Whether you’re comfortable with the modern online portal or prefer the old-school paper route, one thing is certain: precision is everything. A tiny slip-up—a missed signature or a confusing date—can get your application sent back, forcing you to start the waiting game all over again.
The choice between online and paper is really up to you. The online portal is great for getting real-time updates and is generally faster for uploading digital documents. On the other hand, many people find comfort in physically assembling and reviewing a paper package. There’s no right or wrong answer here; just choose the method you’re most comfortable with and commit to doing it perfectly.
Tackling Tricky Sections on the Form
From my experience, a couple of sections on the citizenship application tend to cause the most headaches: the residence/work history and the travel history. IRCC scrutinizes these parts to confirm you meet the physical presence requirements, so getting them right is absolutely critical.
You need to account for every single month of your address and work history over the last five years. Don’t leave any gaps. Even if you were between apartments for a week, you need to explain it. A simple note like “staying with family between moves” is usually enough to prevent an officer from sending you a formal request for more information, which can add weeks or months to your processing time.
Here’s a pro tip: Make sure the addresses on your application form are a perfect match for the addresses on your tax records and employment documents. Any inconsistency is a potential red flag that can slow things down.
The travel history section demands the same meticulous approach. You must list every single trip you took outside of Canada during your five-year eligibility period. Be exact with dates and destinations. Before you submit, pull out your passport and your CBSA travel history report and cross-reference every entry to ensure everything lines up perfectly.
Paying Your Fees Correctly
Your application won’t even be looked at until the government fees are paid in full. This is a hard-and-fast rule. You have to pay online through the official IRCC portal and include the proof of payment with your application.
For a typical adult application, you’ll be paying two main fees:
- Processing Fee: This is what IRCC charges to assess your application.
- Right of Citizenship Fee: This is only refunded if, for some reason, your application is refused.
Once you pay, the system will generate an official receipt. You absolutely must include this receipt with your application. If you’re applying on paper, print the full receipt (not a screenshot!) and place it right at the front of your package. For online submissions, you’ll just upload the digital file.
Organizing Your Paper Application Package
If you decide to go with a paper application, how you present it matters more than you might think. A neatly organized package makes a good first impression and makes life easier for the person who has to review it. Think about it from their perspective: a clean, logically ordered file is always going to be easier to process than a messy stack of papers.
Here’s a simple checklist I always recommend for assembling a physical application:
- Document Checklist (IMM 5525): This should be the very first page. Make sure you’ve ticked off every item you’ve included.
- Fee Receipt: Your official online payment receipt comes next.
- Application Forms: All forms, signed and dated, follow the receipt. Double-check those signatures!
- Supporting Documents: Arrange these in the exact order they appear on the checklist—passport copies, PR card photos, language results, and so on.
For those with more complex situations, such as those needing information on an open work permit extension while waiting, clarity is key. I suggest using paper clips to group related documents together. It’s a small detail, but it shows you’re organized and helps your Canadian citizenship application move along that much more smoothly.
Getting Ready for Your Citizenship Test and Interview
This is it—the final big hurdle before you take the Oath of Citizenship. Facing the test and interview can feel a little nerve-wracking, but with the right preparation, you can walk in feeling completely confident.
Ultimately, this whole process is designed to check two main things: that you know a bit about your new country and that you can communicate in either English or French. It’s not meant to be a trick. Think of it less like a scary final exam and more like a conversation to confirm you’re ready to embrace the rights and responsibilities of being a Canadian.
Know the “Discover Canada” Guide Inside and Out
The only study guide you need is the official one from Immigration, Refugees and Citizenship Canada (IRCC): “Discover Canada: The Rights and Responsibilities of Citizenship.” Seriously, don’t bother with other unofficial materials you might find online—they could be wrong or outdated. Every single question on the test comes directly from this book.
The test is usually a straightforward multiple-choice quiz. The best way to tackle it is to truly understand the material, not just try to memorize random facts.
Here’s what you should really focus on:
- How Canada is Run: Get a handle on the three levels of government (federal, provincial/territorial, and municipal). It’s also important to understand the difference between our constitutional monarchy and a parliamentary democracy.
- Our History: You’ll need to know the major milestones, from the history of Indigenous peoples and the arrival of the French and British, right through to Confederation and what makes up Canada’s modern identity.
- Symbols and Geography: This is the fun stuff! Be familiar with national symbols like the flag and our anthem. It’s also a good idea to be able to point out the provinces, territories, and their capitals on a map.
- Your Rights and Responsibilities: This is a big one. You have to understand the rights guaranteed under the Canadian Charter of Rights and Freedoms and the responsibilities that come along with them, like voting in elections and obeying the law.
A classic mistake is leaving all the studying for the last minute. A much better approach is to take it slow. Try reading one chapter of “Discover Canada” each day, then immediately take an online practice test on that chapter to lock in what you just learned.
What to Expect at the Citizenship Interview
The interview often happens on the same day as your test. For most people, it’s a quick, simple chat with a citizenship officer—it’s definitely not an interrogation. The officer just wants to verify who you are, look at your original documents, and confirm you can speak one of our official languages.
You’ll be asked to show the originals of the documents you sent with your application, like your passports and your PR card. They might ask a few simple questions to double-check details from your application form, such as your current address or a recent trip you took. This is also their chance to gauge your English or French skills through a bit of casual conversation, so be ready to answer clearly and confidently.
Becoming a citizen is a huge step in making your connection to Canada official. It’s interesting to note that the integration journey doesn’t stop after the ceremony. A Statistics Canada study on immigrant retention found that immigrants who became citizens between 2003 and 2007 had an active presence rate of about 97% the year before they naturalized, which dipped slightly to 95% the year after. It’s a good reminder that settling into a new country is a long-term process.
For many, family support is a critical part of the journey, especially for those who arrived through spousal sponsorship. If you’re helping a partner navigate their own path to Canada, our guide on spousal sponsorship requirements in Canada can be a huge help. Being well-prepared for every stage, from the initial sponsorship to the final citizenship test, makes the entire process much smoother for everyone involved.
From Submission to Ceremony: What Happens Next
Hitting that “submit” button on your Canadian citizenship application is a huge moment. After all that work—gathering documents, calculating your days in Canada, and triple-checking every last detail—it’s easy to feel like the hardest part is over. And while you should definitely take a moment to celebrate, this is really the start of the final leg of your journey, not the end.
The waiting period can feel like a bit of a black box, but knowing what’s happening behind the scenes makes it much more manageable. The trick is to stay on top of your application status and be ready to jump on any requests from Immigration, Refugees and Citizenship Canada (IRCC). Honestly, this is where patience becomes your most important virtue.
Keeping Tabs on Your Application
Once your application is officially in the system, your best friend will be the IRCC online portal. This is your window into the process, letting you see your application move from one stage to the next. Getting familiar with what each status update actually means will save you a lot of unnecessary stress.
You’ll generally see your application progress through a few key statuses:
- Submitted: This is just a simple confirmation that IRCC has your application.
- In Progress: This is the big one. It’s a broad status that means an officer is actively reviewing your file. It can cover anything from background checks to getting you scheduled for your test.
- Decision Made: This is the update everyone is waiting for. It means a final decision on your eligibility has been reached.
It’s completely normal for your application to sit “In Progress” for what feels like an eternity. Don’t panic! This doesn’t signal a problem; it just reflects the incredibly detailed security and background checks happening behind the scenes. For a realistic idea of what to expect, check out our guide on current Canadian immigration processing times.
Responding to IRCC Requests
Every now and then, an IRCC officer might need a bit more information to move your file forward. This is called a Request for Additional Information, and if you get one, the first thing to do is take a deep breath. It’s a routine part of the process, often just for a simple clarification or an updated document.
The most critical thing is to respond promptly and completely. Pay very close attention to the deadline in the request. Missing it can result in your application being declared abandoned, which is heartbreaking because it means you have to start the entire process from scratch.
I’ve seen it happen—one of the most common reasons for a delay at this stage is a slow response to an IRCC request. Treat any communication from them as your top priority. Gather exactly what they’ve asked for and get it submitted well before the deadline.
It’s also helpful to keep the bigger picture in mind. Canada’s Immigration Levels Plan for 2025-2027 is ambitious, aiming to welcome 395,000 new permanent residents in 2025 alone. This large-scale plan impacts processing across all immigration streams, citizenship included. With roughly 40% of these newcomers expected to be temporary workers and students already in Canada, it underscores why having a clear and complete application is so vital for a smooth transition. You can dive deeper into these targets by exploring the full immigration levels plan.
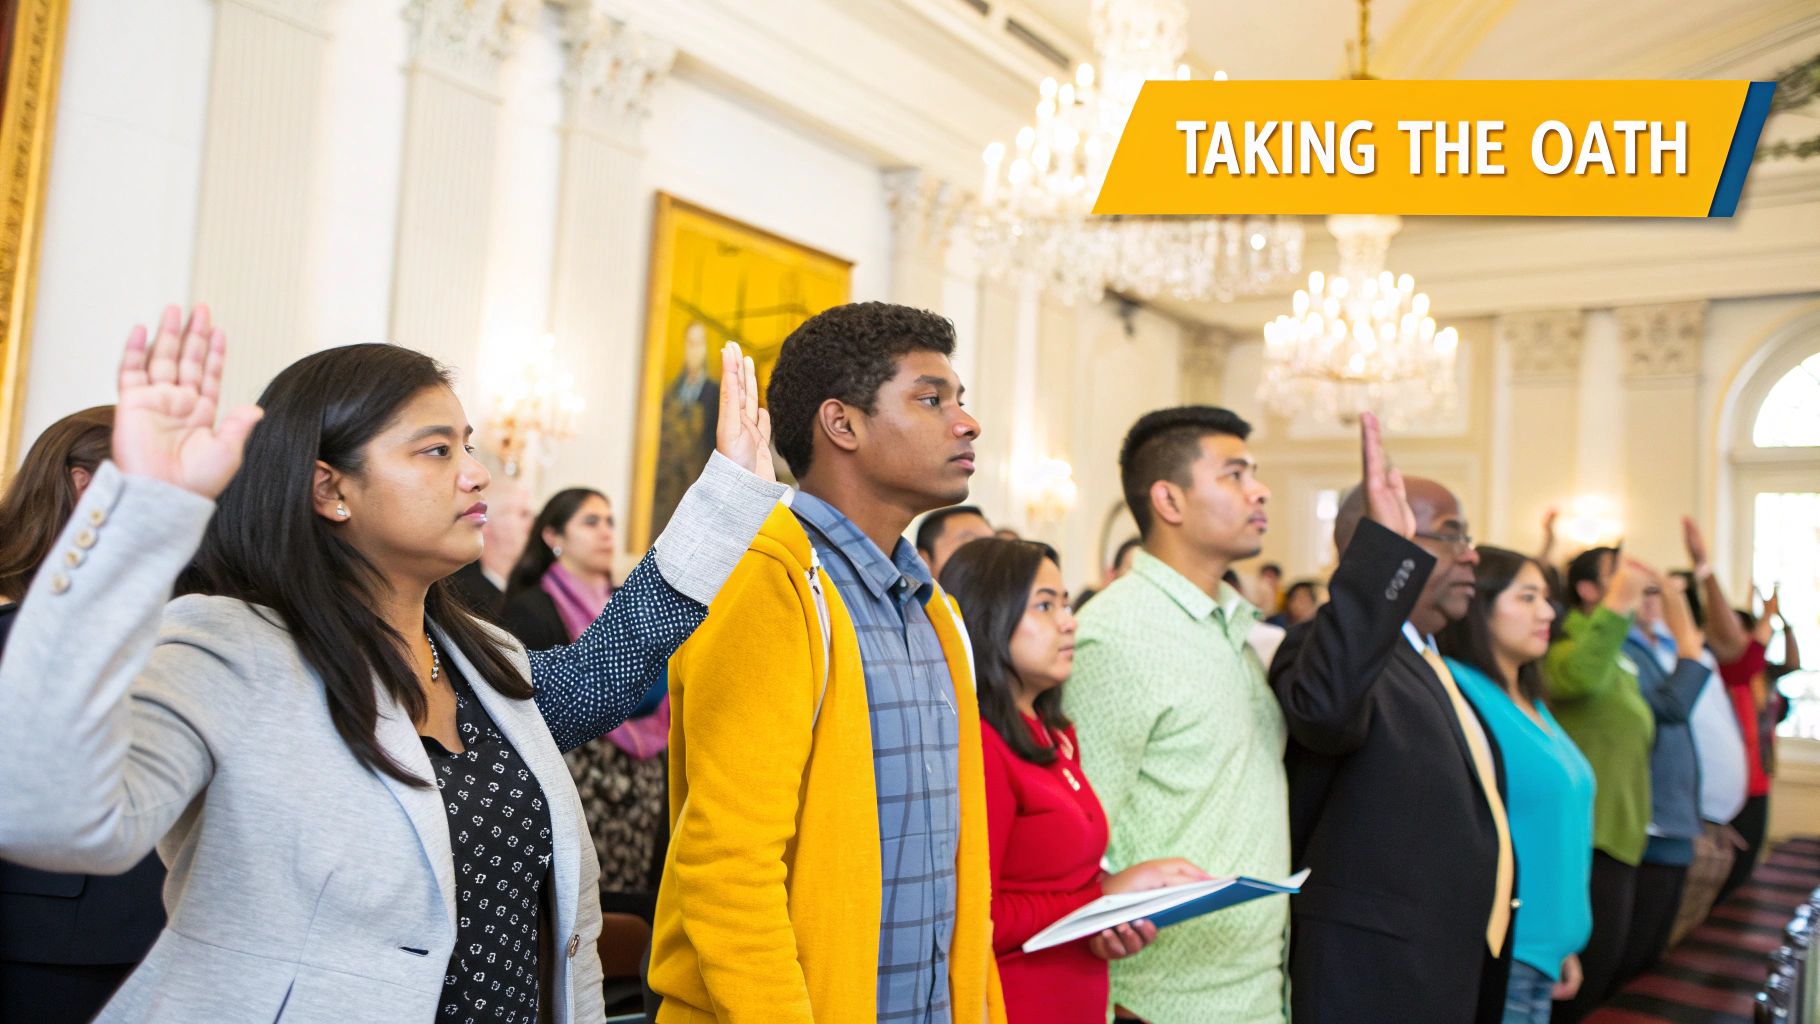
The Citizenship Ceremony: Your Final Step
Receiving your invitation to the citizenship ceremony is the moment it all becomes real. This is it—the final, official step to becoming a Canadian citizen. Ceremonies are held both in-person and virtually these days, and your invitation will lay out all the specific details you need.
The ceremony itself is a genuinely moving experience. You’ll join other new Canadians to take the Oath of Citizenship, a formal declaration of your commitment to Canada. Taking this oath is the legal act that officially makes you a citizen.
Here’s a quick rundown of what to expect on the day:
- Check-In: You’ll need to show your invitation and hand over your Permanent Resident card for the last time.
- The Ceremony: A citizenship judge or presiding official will speak about the rights and responsibilities of being Canadian.
- Taking the Oath: You will be asked to stand and recite the Oath of Citizenship in either English or French. It’s a powerful moment.
- Receiving Your Certificate: After the oath, you’ll get your Certificate of Canadian Citizenship. Keep this document safe forever!
There’s no strict dress code, but most people dress up a bit—think business casual or even traditional attire that’s meaningful to them. It’s a day of celebration. Once the ceremony is over, you are officially a Canadian citizen and can apply for your first Canadian passport, marking the successful end of a long and rewarding journey.
Common Questions on the Path to Citizenship
The journey to becoming a Canadian citizen is exciting, but it’s also full of detailed steps that can leave you with a lot of questions. Getting clear, straightforward answers can make all the difference, helping you feel confident as you work through your Canadian citizenship application.
Let’s tackle some of the most common questions we hear from applicants in Ontario and across Canada. Think of this as a practical FAQ to help you handle the final stages of the process.
Can I Travel Outside Canada After Submitting My Application?
Yes, you can absolutely travel. As a permanent resident, you have the right to leave and re-enter Canada. But there’s a catch. You have to maintain your primary residence in Canada for the entire time your application is being processed.
So, while a short vacation or a necessary business trip is perfectly fine, long absences can cause problems. IRCC might start to question your intent to actually live in Canada. More practically, you need to be available for your citizenship test, interview, and ceremony—and the notice for these events can be surprisingly short.
Key takeaway: Always make sure Immigration, Refugees and Citizenship Canada (IRCC) has your current Canadian address. If you move—even to a different apartment in the same building in Burlington—update your address online right away. Missing a crucial notice is a headache you don’t need.
What Happens If I Fail the Citizenship Test?
It’s a common worry, but failing the test once isn’t the end of your application. If you don’t pass the first time, IRCC will automatically schedule you for a second attempt. It’s built right into the process.
If you happen to be unsuccessful on the second try, your application still isn’t refused. The next step is a hearing with a citizenship officer. This is basically an interview where the officer will assess your knowledge of Canada and your language skills verbally instead of through a written test. It’s just a different way for you to show you meet the requirements.
How Long Does the Entire Citizenship Process Take?
This is the question everyone asks, and the honest answer is: it varies. A lot. IRCC posts official estimates on their website, but in our experience, a straightforward Canadian citizenship application typically takes anywhere from 12 to 24 months to process, from submission to the oath ceremony.
What makes the timeline longer or shorter? A few things:
- A Complete Application: A perfectly prepared application with zero missing documents or information will always move faster. No question.
- Your Case’s Complexity: If your file has anything out of the ordinary, like a complicated travel history, it will likely get a more detailed, and therefore longer, review.
- IRCC’s Workload: The processing volumes at different Canadian offices can also impact how quickly your application gets looked at.
The single best thing you can do to speed things up is to put in the effort at the beginning. Submitting a flawless, meticulously organized application package is your best defence against delays and requests for more information later on.
Navigating the citizenship process can feel overwhelming, but you don’t have to figure it all out on your own. At UL Lawyers, our team has years of experience guiding clients through every immigration stage with clarity and compassion. We are based in Burlington, Ontario and proudly serve clients throughout the GTA and all of Ontario. If you have questions or need a hand with your application, we invite you to contact UL Lawyers for a consultation.